What is Progressive Disclosure? Show & Hide the Right Information
Progressive disclosure is one of the ways of reducing UI complexity and it may come in handy whenever designers want to make products less overwhelming for the end-user.
This article explores progressive disclosure, when to use it, helpful UI components, real-world examples, and a step-by-step process for implementing this design technique.
Design user experiences your customers love with the world’s most advanced design tool. Sign up for a free trial to create your first interactive prototype with UXPin.
What is Progressive Disclosure?
Progressive disclosure is a technique UX designers use to reduce cognitive load by gradually revealing more complex information or features as the user progresses through a user interface of a digital product.
Jakob Nielsen, co-founder of the famous Nielsen Norman Group, introduced progressive disclosure in 1995 as an interaction design pattern to reduce user errors for complex applications.
Designers achieve this by breaking complex tasks into smaller, more manageable steps and presenting these to users one at a time. This step-by-step approach allows users to complete large tasks without being overwhelmed by too much information and instructions at once.
The most common example of progressive disclosure is a multi-step form, typically used for eCommerce checkouts. An example may look like the following:
- Step one: name and delivery address
- Step two: shipping options
- Step three: order confirmation and payment details
- Step four: success/thank you page
What are the three categories of progressive disclosure?
There are three categories for progressive disclosure:
- Step-by-step: breaking complex tasks into manageable steps
- Conditional: hiding certain elements and features until the user requests them
- Contextual: offering additional information and options to provide context based on the user’s current situation
What is progressive enabling?
Progressive enabling is a similar design technique that gives users incremental access to features and functionality as they become more familiar with a product. This technique is especially effective for complex products, allowing users to fully comprehend each feature before moving to the next.
The levels in video games are an excellent example of progressive enabling. Players start with basic features and difficulty, which grow in complexity with each level.
When to Implement Progressive Disclosure

Here are four instances where designers might consider progressive disclosure.
Complex tasks
Breaking complex tasks into manageable chunks makes it easier for users to understand and complete. If you save each step, users don’t have to complete everything at once and can return later.
Contextual help
Designers often use contextual help through tooltips, popups, hotspots, and other UI elements to direct users through tasks. For example, a designer can highlight the form field a user must complete next so they know where to focus.
Onboarding
Progressive disclosure is highly effective for onboarding, where designers provide in-app tutorials and walkthroughs to explain steps in a specific process, including using contextual help.
Content design
Content, especially in product documentation, can be overwhelming to read and digest. Content designers can use progressive disclosure to present users with the most important information first, with the option to explore more content for those who need it.
UI Patterns for Progressive Disclosure
Here are some examples of how designers use UI design patterns for progressive disclosure.
Accordions
Accordions give users control over when and if they need content. These design patterns are particularly helpful when designers have to present a lot of content, like FAQs.
Tabs
Tabs allow designers to organize content into categories so users can choose when they need it. These tabs also reduce scrolling, which is particularly helpful on mobile apps.
Dropdown menus
Dropdown menus help keep UIs uncluttered by hiding long lists. Hiding this content allows users to focus on the current task without being distracted by irrelevant content. For example, imagine trying to complete a form with all the countries, states/provinces, and cities visible. It would be a nightmare to navigate.
Scrolling
Presenting users with the most important content high on the page above the fold can help them find answers or complete tasks without scrolling. Designers can provide supplementary content and features when users scroll. Sales landing pages often use this type of progressive disclosure to make a decision immediately or scroll for more information.
Explore: 4 types of scrolling patterns.
Dialog boxes & popups
Dialog boxes, popups, and tooltips provide users with additional information when they hover or click on a UI element. This progressive disclosure technique lets users find answers without leaving the task while keeping interfaces uncluttered.
Examples of Progressive Disclosure
GOV.UK bank holiday page
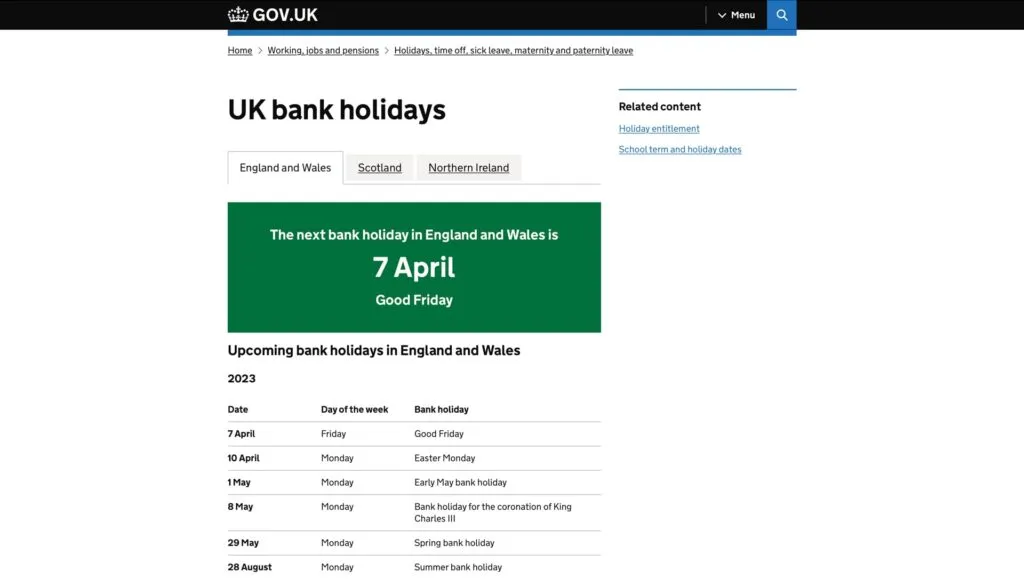
The most famous progressive disclosure case study for content design is the UK government’s GOV.UK bank holiday page redesign. The initial web design was busy and overwhelming.
Through user research, the team learned that most people wanted to know the date of the next bank holiday. The redesign presents users with the upcoming bank holiday at the top of the screen using a clear visual hierarchy, with the following days in smaller text below.
Google’s Advanced Search
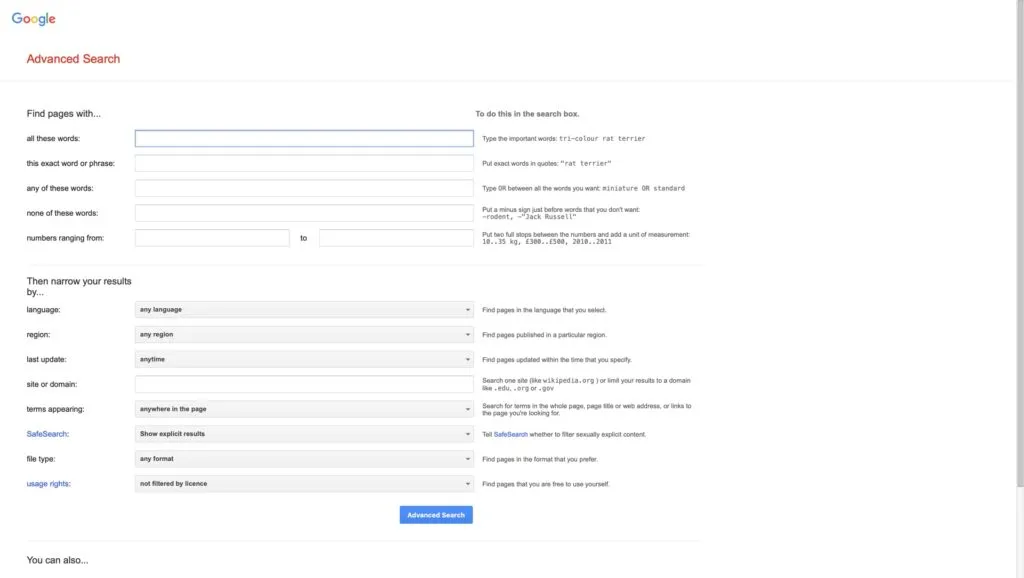
Google’s primary search is simple: one input field with a few options, including an image search and two buttons. Most users will only use this basic search feature.

Google’s Advanced Search is more complex, with multiple fields and options for users to get more granular, including settings for language, region, exact phrase, last updated, etc.
Dropbox’s File-Sharing Options
When you share a file in Dropbox, the file-sharing options are initially hidden, with only the email field and “Share file” button visible.

Users must click “Settings” to access more advanced settings like “File settings” and “Link for viewing” options.

eCommerce product pages
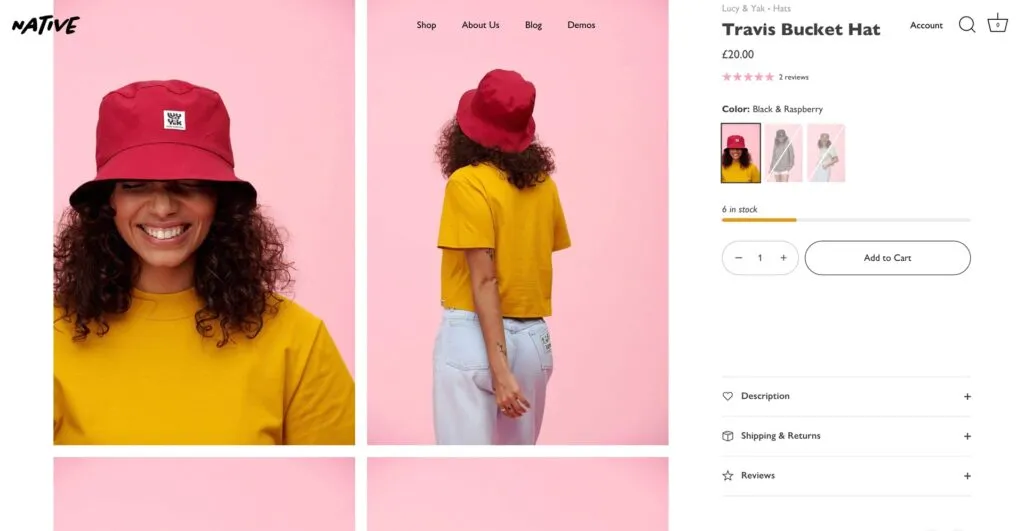
Designers use progressive disclosure on product pages, so they don’t overwhelm customers. A standard technique is to use accordions or tabs to hide details so shoppers can choose if and when they want to see them.
For example, only the quantity stepper and “Add to Cart” button are visible on this product page from Shopify Themes. The product’s description, shipping and returns, and reviews are hidden behind accordions.
Progressive Disclosure Design Process
Identify user needs
As we saw in the GOV.UK example above, understanding what content and information your users need is vital for progressive disclosure. Designers can use fundamental UX research techniques like user interviews and usability testing to determine these needs.
Prioritize information
Next, designers use card sorting and affinity mapping to prioritize information and features to help users accomplish their goals efficiently. For example, designers may hide the lowest priority items or use the hierarchy to create an efficient multi-step process.
Determine the correct level of detail
Once they have prioritized the information, designers must determine the level of detail for each one. What information must designers present immediately, and what must follow?
For example, with GOV.UK, the most important information what the next bank holiday. The level of detail users required was the date and name of the holiday–for example, December 25, Christmas Day. The other holidays followed sequentially with the same level of detail.
Design for simplicity
Keeping user interfaces simple and easy to use is crucial. Designers must only provide the content and features required to complete a single task or decision–which is why the first three steps above are essential for progressive disclosure.
John Maeda’s 10 Laws provide an excellent framework for achieving design simplicity:
- Reduce: remove what isn’t needed
- Organize: makes complex systems easier
- Time: saving time feels like simplicity
- Learn: knowledge makes things simple
- Differences: balancing simplicity and complexity
- Context: “What lies in the periphery of simplicity is not peripheral”
- Emotion: more emotion is better than less
- Trust: simplicity = trust
- Failure: some things aren’t meant to be simple
- The one: subtract the obvious and add the meaningful
Prototype and test
The last step is to prototype and test your solution. Designers must also consider usability and ensure the design doesn’t introduce problems. For example, hiding features so users can’t find them.
Create Better Prototypes With UXPin
UXPin’s advanced features allow designers to create immersive prototypes indistinguishable from the final product. With fully functional forms and code-like interactivity, design teams can test ideas to find a solution that best solves user needs while providing maximum business value.
These four UXPin features enable designers to build advanced prototypes:
- States: create multiple states for a single component and build complex UI patterns like dropdown menus, steppers, carousels, and accordions–essential for progressive disclosure user testing.
- Interactions: use Triggers, Actions, and Animations to design immersive prototype experiences. With Conditional Interactions, designers can create dynamic interactivity according to user actions.
- Variables: collect data from user inputs and use it elsewhere in the application. Designers can use these variables to personalize the prototype experience to feel like the final product.
- Expressions: design form validation, computational components, dynamic error messages, and more. When combined with States, Interactions, and Variables, Expressions enable designers to create Javascript-like functionality.
Build prototypes that allow your team to get meaningful, actionable results from testing. Sign up for a free trial to create your first UXPin prototype today.
